

Cleaning Stainless Steel Boat Hardware: 2026 Guide
Scrubbing harder can turn a surface mark into a scratch. If salt and water spots keep returning, it’s reasonable to wonder how to clean stainless steel boat hardware without damaging the finish or making corrosion worse. The key is to match the method to the mark, not apply more force.
A freshwater rinse and gentle wash remove many salt deposits, but discoloration can have different causes. Tea staining is usually a surface mark; small pits in the metal point to more serious damage. Knowing the difference helps you choose a sensible next step and avoid harsh cleaners or abrasive tools that can make the surface worse.
This guide walks through a safe, repeatable cleaning routine, explains which cloths and cleaners to use, and shows how to spot signs that need more than routine washing. You’ll also learn how regular freshwater rinsing and inspection can help keep fittings, including boat flag-mounting hardware, looking presentable.
Table of Contents
Why stainless steel boat hardware gets salt marks and surface rust
How to clean stainless steel boat hardware without scratching it
Choosing a stainless steel cleaner, polish, or corrosion treatment
How to tell surface stains from corrosion that needs attention
Build a maintenance routine for stainless steel boat hardware
Why stainless steel boat hardware gets salt marks and surface rust
Stainless steel is an iron-based alloy that resists corrosion because chromium helps form a thin protective film on its surface. The film can renew itself when conditions allow, but it doesn’t make the metal immune to staining. The properties of stainless steel explain why the material performs well in many environments while still needing care around saltwater.
Salt left behind as water evaporates can concentrate on a fitting, especially around joints, fasteners, and edges. Moisture, dirt, and particles transferred from other metals can also contribute to discoloration. Areas with limited airflow may stay damp longer, allowing deposits to linger in crevices or beneath fittings. Exposure and surface condition both matter, so a rust-colored mark doesn’t point to one certain cause.
Stainless steel resists corrosion, but it isn’t completely rustproof. In a marine setting, chloride salts can challenge the surface’s protective film. The first visible sign may be a light brown or tea-colored stain, but color alone can’t show whether the mark is residue, surface staining, or deeper damage. Understanding the difference helps you decide how to clean stainless steel boat hardware without treating every mark as a crisis or scrubbing more aggressively.
What causes tea staining and rust-colored marks on a boat?
Tea staining describes discoloration on stainless steel, often appearing as a brownish film or streak. It isn’t automatically evidence of structural failure. Salt and other contaminants can remain when spray or rinse water dries, then become visible as deposits build up. Marks may be more noticeable near seams or where water collects. A gentle wash can remove some residue, while persistent staining may need closer attention.
Conditions vary from fitting to fitting. A clean, exposed surface may dry quickly, while a sheltered joint can retain moisture and deposits. Contact with iron-containing contamination, such as particles transferred from a steel tool, can also leave rust-colored marks. Color alone can’t confirm which cause applies.
When should you inspect a mark instead of cleaning it?
Look closely if discoloration returns quickly, remains after gentle cleaning, or appears alongside pitting, flaking, cracks, or visible material loss. Pits are small depressions in the metal, not just a colored film. Cleaning or polishing may improve appearance, but it can’t restore lost metal or repair a crack. Don’t rely on a cleaner to resolve a physical defect.
Inspect the fitting as a whole, including nearby joints and concealed areas where salt and moisture can collect. Check around fasteners, beneath overlapping parts, and along edges where deposits may be easy to miss. If you see damage or the condition is worsening, treat that as a reason for closer assessment rather than simply repeating the cleaning process. Appearance is a useful clue, not a definitive test of alloy, plating, or structural condition.
How to clean stainless steel boat hardware without scratching it
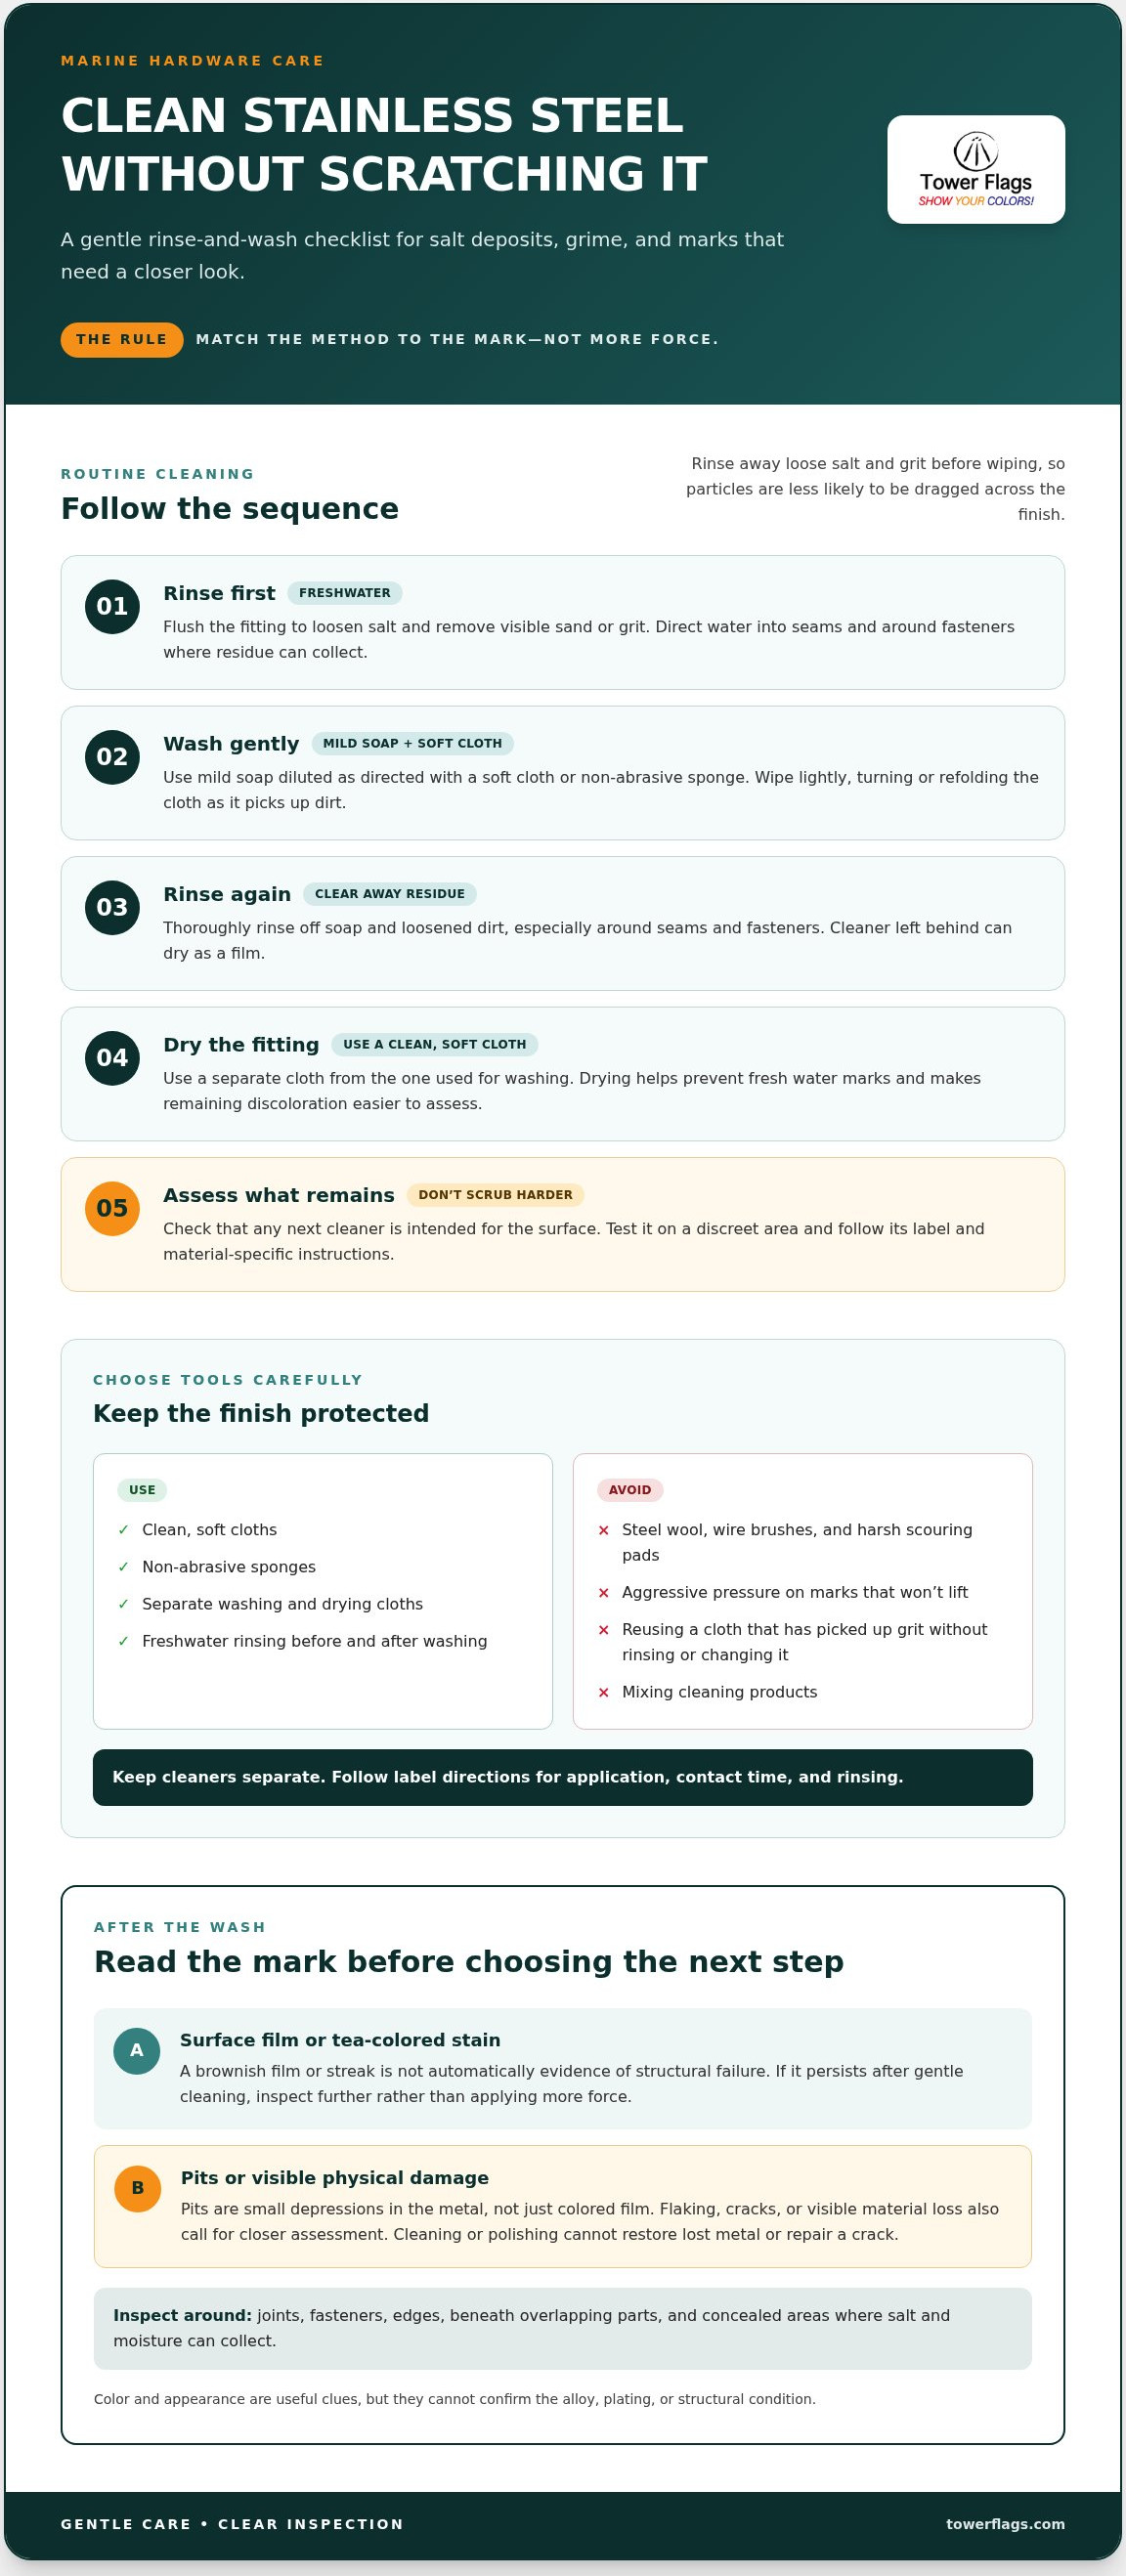
For routine salt deposits, start by rinsing the fitting with clean freshwater before wiping it. This carries away loose salt and grit instead of dragging particles across the metal. A soft, non-abrasive cloth and mild soap are usually enough for ordinary grime. Keep pressure light; extra force won’t make cleaning more effective.
A simple rinse, wash, and dry routine
Work through the steps in order, using clean water and cloths, especially around tight corners and joints where residue collects. For how to clean stainless steel boat hardware without marring the finish, don’t skip the first rinse. It helps clear away particles that could act like abrasive grit during washing.
Rinse first. Flush the fitting with freshwater to loosen salt and remove sand or other visible grit. Direct the rinse into seams and around fasteners if those areas are hard to reach.
Wash gently. Use mild soap diluted as directed and a soft cloth or non-abrasive sponge. Wipe without pressing hard, and turn or refold the cloth as it picks up dirt so you don’t rub collected grit over the surface.
Rinse again. Remove soap and loosened residue thoroughly with freshwater. Cleaner left in a seam or around a fastener can dry on the surface and leave a film.
Dry the fitting. Use a separate, clean, soft cloth. Drying helps prevent fresh water marks and makes remaining discoloration easier to assess.
Assess what remains. If a mark persists, don’t immediately scrub harder. Check that the cleaner is intended for the surface, test it on a discreet area, and follow its label and any material-specific instructions.
Use a different cloth for drying than for washing. A cloth that has collected salt, grit, or soap can transfer residue back onto the fitting. Keep cleaners separate, too. Never mix cleaning products, since combining chemicals can create hazards or damage surfaces. Follow label directions for application, contact time, and rinsing.
Which tools and cleaning habits can damage the finish?
Steel wool, wire brushes, harsh scouring pads, and other abrasive tools can scratch stainless steel. They may also leave behind particles that contribute to rust-colored marks. Avoid them unless the hardware maker specifically permits their use. A soft cloth is a controlled choice for routine cleaning. If it drops onto a gritty deck, rinse it or switch to a clean one before continuing.
Choose clean, soft cloths or non-abrasive sponges, and keep washing and drying cloths separate.
Don’t use aggressive pressure to compensate for a mark that won’t lift with mild soap.
Test a new cleaner in a discreet spot and follow its label rather than improvising a stronger mixture.
Cleaning is also a useful moment to inspect the parts of a boat’s flag-mounting setup. Tower Flags designs and manufactures custom-fabricated marine flag brackets and flag poles tailored to boat owners.
Choosing a stainless steel cleaner, polish, or corrosion treatment
Choose a product for the condition you’re addressing, not simply because its label says “stainless steel.” Routine grime and salt residue usually call for mild soap and water. A polish may improve the appearance of certain suitable surfaces, while a corrosion treatment is intended for specific staining or surface conditions. These products aren’t interchangeable, and none should be expected to repair lost or damaged metal.
Marine exposure makes the fitting’s material and placement relevant. Salt, moisture, and trapped deposits affect hardware differently depending on its surface and design. For broader context on selecting hardware for a boat’s environment, see our Durable Boat Flag Hardware: Marine Guide.
When is soap enough, and when might polish help?
Start with mild soap and water for ordinary dirt or salt film. If a clean, washed surface still has a mark, consider a metal polish only if its label identifies the surface and condition as suitable. Polish can improve appearance or address certain surface marks, but it doesn’t restore metal removed by pitting or correct structural damage.
Read the directions before applying polish. Check the recommended application method, whether the product must be rinsed or buffed away, and any instructions for surfaces that contact food. Use only the amount and contact time specified by the maker. Don’t assume a product safe for one finish or material is suitable for every fitting on a boat.
What should you know before using rust remover or passivation?
A rust remover or corrosion treatment is a more targeted choice than routine soap. Use it only for the purpose and compatible materials stated on its label. Some formulations can affect nearby finishes or materials, so identify what the product may contact and protect adjacent surfaces as directed. Don’t combine cleaners or improvise a stronger treatment.
Passivation is different from washing or polishing. It is a specialized surface treatment intended to support the protective oxide layer on stainless steel, not a routine step for removing everyday dirt. The appropriate process depends on the metal and product instructions. Avoid treating unknown hardware as a passivation project based on color alone.
Choose soap for routine dirt and salt residue.
Choose polish only for a suitable surface and a mark covered by its instructions.
Consider a corrosion treatment only when its intended use and material compatibility match the problem.
If staining persists after appropriate cleaning, the material is uncertain, or you can see pitting, cracks, flaking, or material loss, stop escalating the treatment and seek a qualified assessment. A cleaner may change the appearance without correcting the underlying condition. The same measured approach applies when maintaining or replacing a boat’s flag-mounting setup. Tower Flags designs and manufactures custom-fabricated marine flag brackets and flag poles tailored to boat owners.
How to tell surface stains from corrosion that needs attention
A mark’s color is a clue, not a diagnosis. Salt residue, water spots, surface contamination, and corrosion can all create discoloration, while the visible surface may not reveal what lies beneath it. Use gentle cleaning as a first check, then inspect the dry fitting for texture changes, recurring marks, or damage. This helps distinguish a cosmetic issue from a condition that may affect the hardware’s integrity.
Which marks may respond to ordinary cleaning?
Loose salt, pale water spots, and light grime are reasonable first targets for freshwater and gentle washing. After rinsing and drying, look again in good light. If a mark remains, don’t assume stronger scrubbing is the answer. The next step in deciding how to clean stainless steel boat hardware depends on the mark’s location, whether it returns, and whether the surface appears damaged.
Likely residue: A surface film or deposit that lifts or changes after gentle washing.
Recurring discoloration: A mark that returns in the same area, especially around a joint or crevice.
Visible damage: A pit, crack, flake, or area where metal appears to be missing.
These are useful inspection categories, not guarantees about what caused a mark. A rust-colored spot, for example, may be surface staining, but its appearance alone can’t confirm the metal’s alloy, whether it has a plated finish, or whether the fitting remains structurally sound.
Which warning signs call for a closer look?
Inspect rather than repeatedly polish if you see small cavities, flaking, cracks, or visible material loss. Also look for discoloration that keeps reappearing around fasteners, seams, and crevices. Deposits or moisture may collect there, but recurring marks can have more than one cause. Check adjacent areas too, since a clean outer face doesn’t rule out a problem in a concealed joint.
Persistent pitting deserves inspection, not repeated polishing, because polish can change the appearance without replacing metal that has been lost. If a mark remains after suitable cleaning, compare its location and texture over time and avoid aggressive abrasion or treatments that assume the material is known. Where the hardware’s composition or condition is uncertain, a qualified assessment is more useful than guessing from color.
Cosmetic improvement is not proof of repair. If cracks, flaking, or material loss are present, have the fitting assessed to determine whether it needs repair or replacement rather than relying on a polished finish. For a boat’s flag-mounting setup, explore custom boat flag brackets and poles tailored to boat owners.
Build a maintenance routine for stainless steel boat hardware
A useful routine is consistent, not complicated. Salt exposure, weather, storage conditions, and visible buildup all affect how often hardware needs attention, so a fixed cleaning calendar won’t suit every boat. Let what the fittings encounter, and what you see during inspection, guide the timing. A light rinse after salt exposure can help keep deposits from sitting unnoticed until the next deep clean.
A practical routine after boating and during storage
After saltwater exposure, rinse accessible hardware with fresh water when practical. Pay attention to the underside of fittings and places where water can collect. Salt left to dry in concealed areas can leave deposits that are easy to miss during a quick deck-side check.
After salt exposure: Rinse the hardware with fresh water, including around joints and mounting points.
As needed: If grime or deposits remain, clean the affected surface using a method suited to the material and mark.
Before storage: Dry accessible surfaces and check crevices, fasteners, and concealed edges for trapped water, residue, or new discoloration.
During inspection: Look for changes such as recurring marks, looseness, cracks, pitting, or visible material loss.
Let exposure set the pace. A fitting regularly splashed with saltwater may need attention sooner than one that stays sheltered and dry. Visible deposits are a practical cue to clean; don’t wait for a mark to become pronounced before checking around a joint. Keeping a brief note of recurring problem spots can also help you notice whether a stain is stable or returning in the same place.
When cleaning is not the whole solution
Cleaning addresses residue and appearance. It won’t secure a loose mount, correct poor fit, or restore metal that has been lost. If a fitting moves, sits unevenly, or shows physical damage, assess its condition and how it attaches before treating the surface again. Repeated polishing can make a damaged area look brighter without resolving the underlying concern.
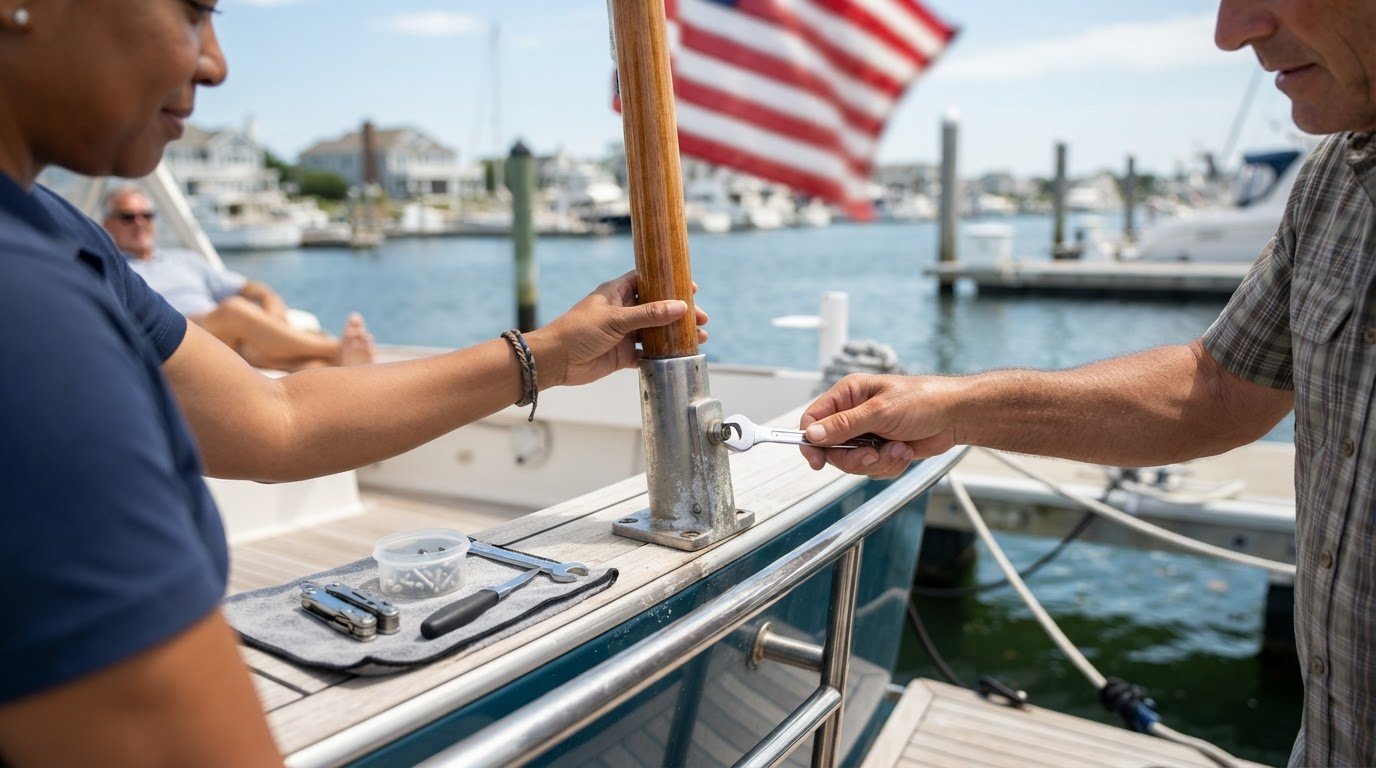
Include the full flag-mount setup in your checks. Review how the bracket sits against the boat, whether connections remain secure, and whether water or grime can collect around the installation. If you’re considering a different setup, the Ultimate Guide to Custom Boat Flag Brackets 2026 can help you evaluate what to consider when reviewing flag-mount options. Tower Flags specializes in custom boat flag brackets and poles, with mounting solutions tailored to boat owners.
For a flag-mount setup that fits your boat, explore custom boat flag hardware from Tower Flags.
Make your next maintenance check count
Use your next inspection to look beyond the finish. A clean-looking fitting still needs to sit securely and suit its role on the boat. If your flag mount is loose, awkwardly fitted, or due for replacement, treat that as a separate hardware decision rather than a cleaning problem. The right setup starts with how the mount needs to fit and function in its marine environment.
Knowing how to clean stainless steel boat hardware gives you a practical way to care for its surface, but good upkeep also means noticing when a fitting needs attention beyond washing. Tower Flags designs and manufactures custom boat flag brackets and poles for boat owners, with mounting solutions tailored to marine environments.
Explore custom boat flag hardware from Tower Flags and take the next step toward a flag mount suited to your boat. Pair a steady care routine with a well-considered setup for your next maintenance check.
Frequently Asked Questions
Is stainless steel boat hardware rustproof?
No. Stainless steel resists corrosion, but marine exposure can still leave rust-colored staining or cause damage. A spot that disappears after cleaning and leaves a smooth surface is different from a pit or flaking area. Inspect the fitting’s edges and contact points as well as its visible face. Discoloration alone can’t confirm the alloy, finish, or structural condition, so don’t treat color as proof that hardware has failed.
Can I clean stainless steel boat hardware with vinegar?
Freshwater and mild soap are a safer first choice than assuming vinegar is suitable. If you’re considering an acidic cleaner, check the hardware maker’s care guidance and the cleaner’s label, since nearby materials or a coated finish may affect what’s appropriate. Test a discreet spot first and follow instructions for rinsing. Never mix vinegar with bleach or other cleaning products. For how to clean stainless steel boat hardware, match the cleaner to the specific surface.
Can I use a steel wool pad on stainless steel boat hardware?
It’s best to avoid steel wool as a routine cleaning tool. Its abrasive fibers can scratch or dull a finish, and particles left behind may contribute to rust-colored marks. If salt residue is on a polished fitting, rinse it off before wiping with a soft cloth. If a mark remains, identify the surface and check cleaner directions rather than applying more pressure or reaching for a coarser pad.
How often should I clean stainless steel boat hardware?
There isn’t one cleaning interval that suits every boat. Salt spray, rain, sheltered storage, and visible buildup all influence how often fittings need attention. Rinse after salt exposure when practical, then clean if residue or grime remains. A quick visual check during ordinary boat care can reveal new discoloration or damage. Use those conditions, along with the hardware maker’s instructions, to set a workable routine instead of following a rigid calendar.
Why does stainless steel develop orange or brown spots?
Orange or brown spots may be surface contamination, dried deposits, or corrosion; their color can’t identify the cause by itself. Start by cleaning a small area gently, then inspect it after it dries. A spot that remains, returns quickly, or has a rough or pitted texture deserves closer attention. Also look for similar marks near fasteners or seams, where residue can collect, and avoid assuming polish will resolve a physical defect.
Can I use bleach to clean stainless steel boat hardware?
Don’t use bleach as a general-purpose cleaner for stainless steel. Chloride-containing products may be unsuitable for the surface, and fittings can have different finishes or adjacent materials. Choose freshwater and mild soap for routine dirt, and follow the hardware maker’s instructions before using a stronger treatment. Never mix bleach with another cleaner. If bleach has already contacted a fitting, use the product label and material guidance to determine the appropriate rinse and next step.
Can polishing repair pitted stainless steel boat hardware?
No. Polishing can improve the appearance of some surface marks, but it can’t replace metal lost to pitting or repair a cracked fitting. Clean and dry the area so you can examine its texture, not just its shine. If you see cavities, flaking, cracks, or missing material, stop treating it as a cosmetic issue. A polished surface is not evidence that the fitting is structurally sound.

Comments