

How to Measure for a Custom Boat Flag Mount
A "universal" boat flag mount is usually just a polite way of describing a part that doesn't actually fit your tower. Most off-the-shelf hardware relies on rubber shims and hope to stay in place, but these compromises often lead to scratched finishes and brackets that rotate the moment you hit the throttle. Learning how to measure for a custom boat flag mount is the only way to avoid these failures and ensure your hardware stays put at 50 knots. If you're tired of seeing your flag lean at a 45-degree angle during high-speed runs, you know that a generic solution isn't enough for a high-performance marine environment.
We understand the frustration of trying to decipher technical specs while standing on a deck. You want a display that looks like it was built into the boat, not something bolted on as an afterthought. This guide will teach you the precise measurement process required for a professional-grade fit. We'll clear up common confusion between diameter and circumference while providing a clear roadmap for securing a custom-fit bracket. By following these steps, you'll gain the confidence to order a custom-fabricated part that protects your tower's structural integrity and remains rock-solid at any speed.
Table of Contents
Why Precision Measurement Matters for Marine Flag Brackets
A "one-size-fits-all" approach works for t-shirts, but it fails miserably on a wakeboard tower. Most generic hardware relies on thick rubber shims to fill the gap between the bracket and the rail. This creates a soft, unstable interface that inevitably leads to hardware failure. When you learn how to measure for a custom boat flag mount, you're moving away from guesswork and toward engineering-level security. We prioritize surface area contact because a bracket that grips the entire circumference of the tower tube is significantly more stable than one that only touches a few points.
Custom-fabricated flag pole brackets require millimeter-level data to function correctly. Without exact measurements, the CNC milling process cannot produce the zero-tolerance fit required for high-performance boating. This isn't just about aesthetics; it's about mechanical integrity. A bracket that fits perfectly distributes the load evenly across the tower structure, preventing the localized stress points that lead to metal fatigue over time. Precision is the baseline for reliability.
The High-Speed Drag Factor
Physics doesn't take a day off when you're on the water. At speeds exceeding 40 knots, a standard marine flag transforms into a high-drag sail. This exerts massive torque on the mounting point. Generic clamps often rotate under this sustained wind pressure, potentially snapping the hardware or sending your flag into the lake. High-performance vessels require a zero-tolerance fit to counteract these forces. By ensuring the bracket is custom-engineered for your specific tower geometry, you eliminate the play that leads to mechanical failure during aggressive runs.
Protecting Your Tower Investment
Loose brackets are more than a nuisance; they are a threat to your boat's value. When a mount isn't perfectly sized, it vibrates. This vibration allows salt, grit, and moisture to get trapped between the mount and the tower. Over time, this creates a scouring effect that permanently ruins powder-coat or gelcoat finishes. While following proper maritime flag etiquette is important for tradition, protecting your tower's structural integrity is vital for longevity. Custom-fit gaskets and precision-milled aluminum ensure the mount stays integrated into the boat design without causing damage. A secure, custom-fit display looks like a factory-installed component rather than a cheap aftermarket addition.
Essential Tools and Terminology for Custom Mounting
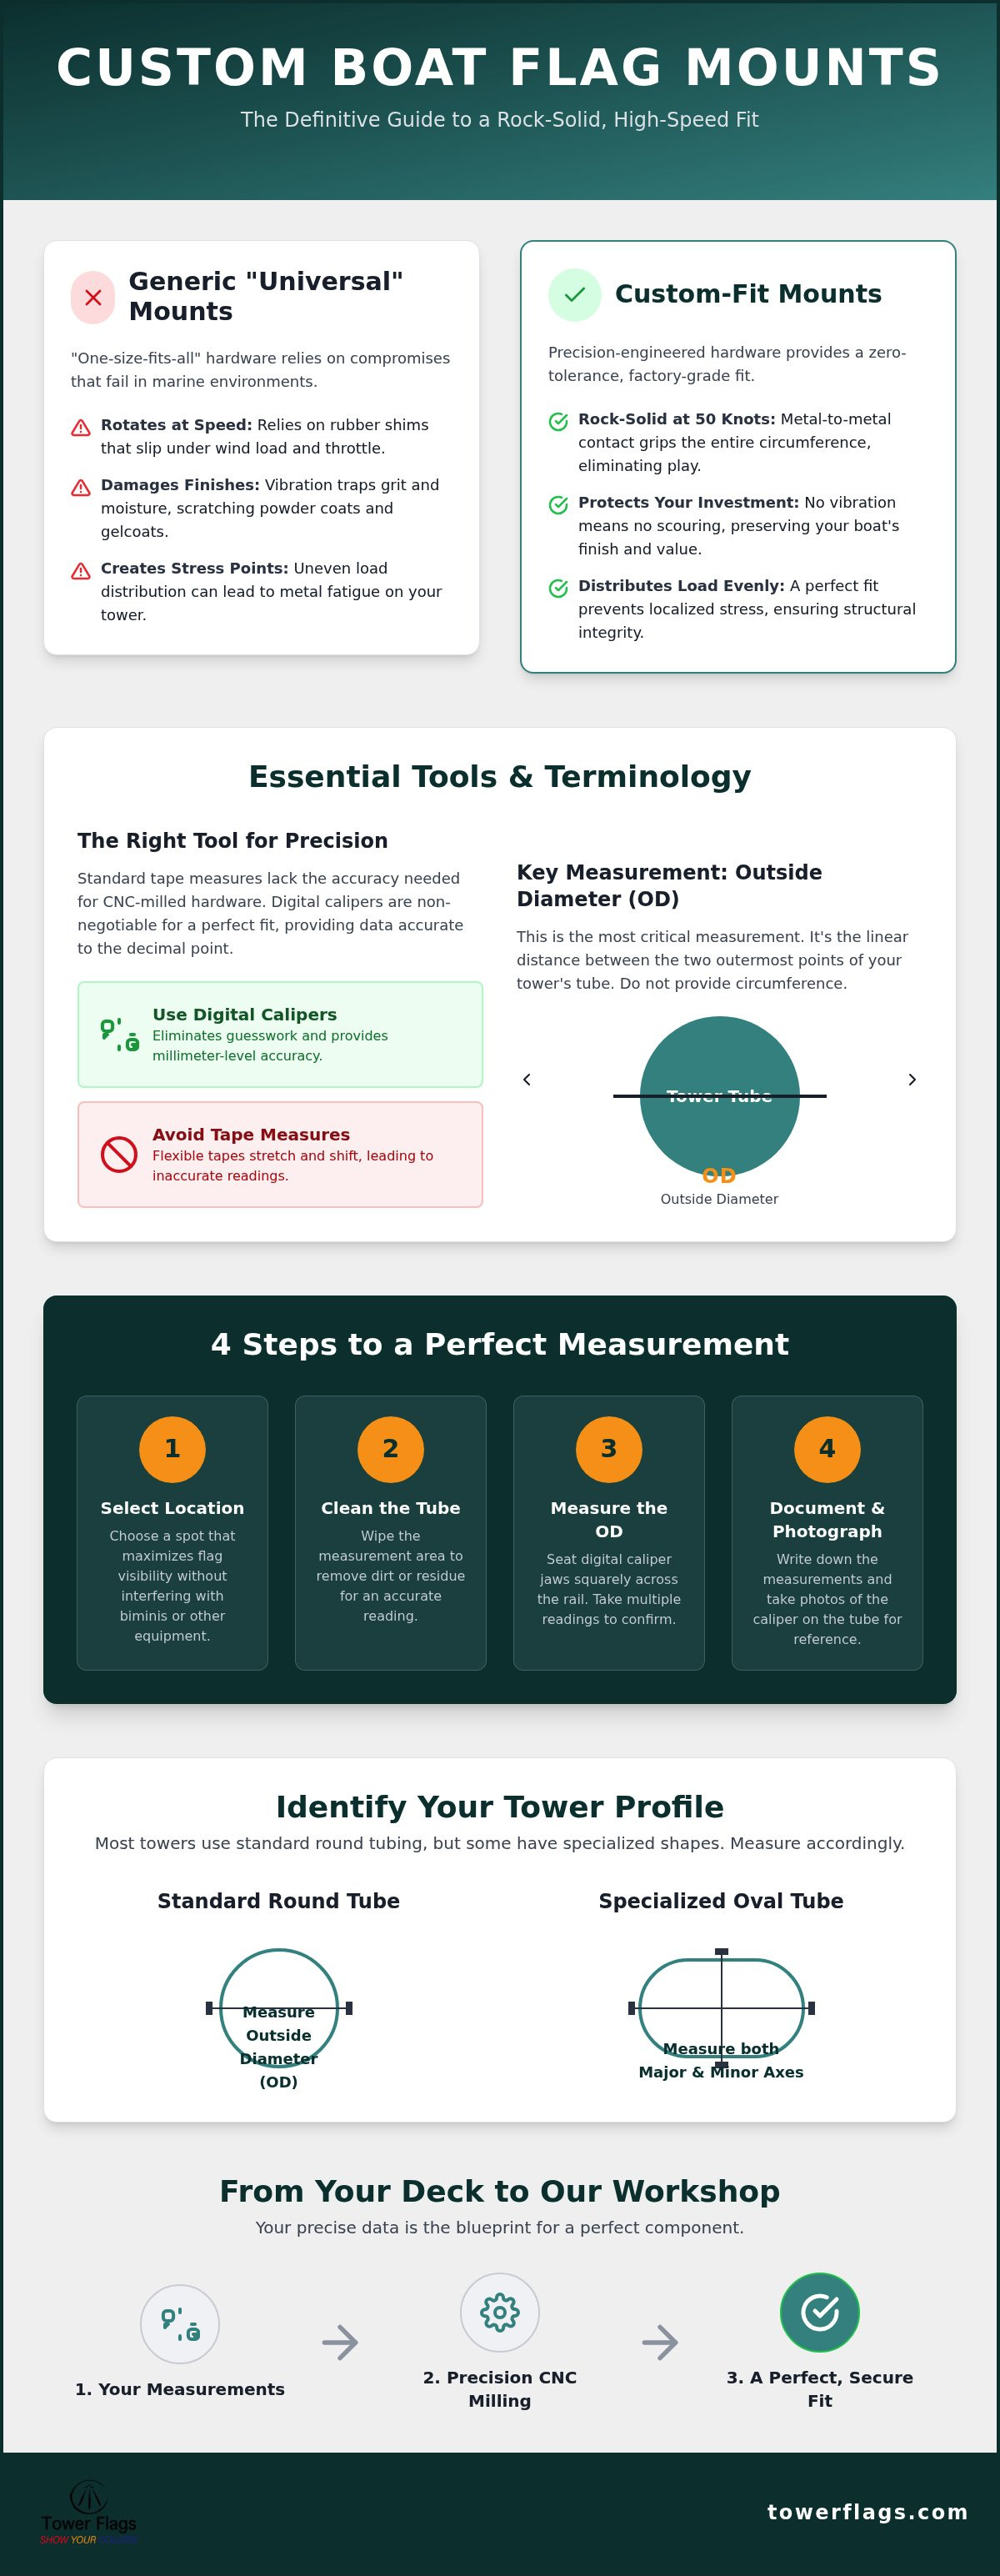
Achieving a perfect fit starts with the right equipment. While a standard tape measure is fine for rough framing, it lacks the precision needed for CNC-milled marine hardware. Digital calipers are the gold standard because they eliminate the parallax error and slack inherent in flexible tapes. When you are learning how to measure for a custom boat flag mount, you need data that is accurate to at least one decimal point. Using a rigid ruler against a curved tower leg is an exercise in frustration that usually results in an oversized bracket that will never sit flush.
Always document your measurements immediately. Use a digital notepad or a physical sketch of your tower to note exactly where each measurement was taken. This record is the foundation of your custom fabrication order. It allows the machinist to visualize the orientation of the bracket relative to the tower's curve. Providing clear, labeled data is the difference between a bracket that slips and one that feels like a factory-welded component.
Digital Calipers vs. Tape Measures
Flexible tailor’s tape can be useful for finding the circumference of non-standard shapes, but you shouldn't rely on it for final diameter readings. Tape stretches and shifts, leading to inconsistent results. To get a true reading with calipers, you must seat the jaws squarely across the rail. Outside Diameter is the linear distance between the two outermost points of a circular or oval profile. If you provide a circumference instead of a diameter, the fabrication team has to calculate the missing data, which introduces a margin for error you want to avoid.
Key Marine Measurement Terms
Understanding technical terminology ensures your hardware integrates seamlessly with existing boat features. Center-to-Center measurement is vital for multi-bolt brackets to ensure the mounting holes align with your tower's pre-drilled points. Clearance Radius is another critical factor, especially on rotating towers or near bimini tops where the flag pole socket might interfere with movement. While Federal regulations for boat construction focus on the safety and seaworthiness of the vessel, your precision ensures that aftermarket additions don't compromise that structural integrity.
Finally, account for Taper, which is the narrowing or widening of tower legs. A measurement taken at the base won't work if you plan to mount your flag pole brackets three feet higher. By measuring the exact spot where the bracket will live, you ensure the internal diameter of the mount matches the tower's geometry perfectly. This attention to detail is what separates a professional installation from a generic, shaky setup.
Identifying Your Tower or Rail Profile
Identifying the specific geometry of your mounting surface is the most critical step in learning how to measure for a custom boat flag mount. While generic brands assume every boat uses standard round piping, modern marine engineering has moved toward complex, aerodynamic profiles. You must categorize your mounting surface accurately before providing data for fabrication. A mistake here means the internal geometry of the bracket won't match the tower, leading to the vibration and finish damage we've already discussed.
Look closely at your tower's cross-section. Is it a perfect circle, or does it have an elongated shape? Modern manufacturers often use proprietary extrusions to increase strength and reduce wind noise. These shapes require a different approach than a standard rail. Once you identify the profile category, you can focus on the specific dimensions that define that shape's footprint on your boat.
Round vs. Non-Round Tubing
Standard round rails are common on bimini tops and older tower models. Industry norms typically fall into 1.9 inch, 2.375 inch, or 3.0 inch diameters. However, performance towers frequently utilize oval or elliptical tubing. For these profiles, a single diameter reading is insufficient. You must measure both the major axis (the widest point) and the minor axis (the narrowest point). Teardrop profiles are even more specialized. They feature a rounded leading edge and a tapered trailing edge. This specific geometry requires a custom-milled internal bracket to ensure the mount doesn't "walk" or shift under the high-drag forces of a 40-knot run.
Specific Brand Tower Geometries
Owners of high-end tow boats face unique challenges. Malibu G3 and G5 towers, for example, feature aggressive curves and varying thicknesses that make generic clamps completely useless. When you are determining how to measure for a custom boat flag mount on these proprietary systems, you need to find a consistent section of the tower leg. Pontoon boats often use rectangular or square rails rather than tubes. For these, measure the flat-surface width and the depth of the rail. Don't forget to check for integrated accessory tracks. Many modern towers have built-in channels for speakers or lights. If you plan to mount near these tracks, ensure your measurements account for the extra hardware already occupying that space. Identifying factory-specific mounting points versus open rail space will dictate whether you need a wrap-around bracket or a track-mounted adapter.
The Step-by-Step Measurement Process
Executing the measurement process with clinical precision is the only way to ensure your hardware functions as intended. Choosing the right mounting location is your first priority. You need a spot that offers maximum visibility for your flag while remaining easily accessible from the cockpit. High-traffic areas or spots directly behind a board rack might seem convenient, but they often lead to tangled lines or obscured displays. Once you've selected the primary location, you can begin the technical data collection required for a professional fit.
Performing the primary diameter measurement with calipers is the core of how to measure for a custom boat flag mount. After you record your diameter, take a flexible tailor's tape and measure the circumference of the same spot. Divide your circumference by 3.14 to verify your caliper reading. If the numbers don't match, you likely have an oval profile or the calipers weren't seated squarely. This double-check prevents costly fabrication errors and ensures the final bracket provides the metal-to-metal contact necessary for high-speed stability.
Mastering the Caliper Measurement
Clean the mounting surface thoroughly before you begin. Salt spray or dried grime can add several tenths of a millimeter to your reading, which is enough to throw off a zero-tolerance CNC mill. Open the caliper jaws and seat them firmly against the rail. Take three separate measurements at different heights within a six-inch span. This identifies any taper in the tower leg that might not be visible to the naked eye. Average these three results to find the most reliable dimension for your custom order. This methodical approach eliminates the guesswork that causes generic hardware to slip.
Accounting for Obstructions
Precision extends beyond the bracket's diameter; you must also consider the surrounding environment. Measure the distance between your intended mount and the nearest tower speaker or light bar. You need to ensure the flag's "swing radius" won't tangle with your bimini top or interfere with nighttime navigation lights. Check that the pole's angle won't strike your board racks when the boat is under power. These clearances are vital for maintaining the structural integrity of your accessories and ensuring your boat remains compliant with safety standards. After you've gathered your data, take a high-resolution photograph of the measurement location. This visual aid allows the fabrication team to verify the orientation of your flag pole brackets before the milling process begins.
From Measurements to Manufacturing: The Tower Flags Process
Once you've mastered how to measure for a custom boat flag mount, your technical data moves from the deck to the workshop. We don't just pick a part off a shelf and hope it fits. Every measurement you provide is fed into our precision CNC milling software to create a profile that matches your tower's unique geometry. This level of customization is what separates American-made fabrication from mass-market imports that rely on generic sizing. When you finalize your order for a custom boat flag bracket, you're investing in a part designed specifically for your vessel's high-speed performance needs.
The transition from raw data to finished hardware is a methodical one. Our team prioritizes exactness because we know the stakes of high-speed marine environments. You can expect a part that reflects the specific nuances of your boat's design, from the taper of the tower legs to the specific alloy requirements for your environment. When your custom-fit hardware arrives, it won't require the guesswork or "rigging" common with inferior alternatives. It's built to perform from the moment you bolt it on.
The Engineering Difference
Our engineering team translates your specific dimensions into a detailed CAD design. This ensures every curve and taper identified during your measurement process is accounted for in the final build. We use high-performance marine-grade materials like 316 stainless steel and anodized aluminum to guarantee maximum corrosion resistance. Because the fit is exact, you won't need to resort to aggressive over-tightening or bulky shims to keep the mount in place. A zero-tolerance fit means the bracket stays secure through mechanical alignment rather than sheer force, protecting your tower's finish over the long term.
Next Steps for Your Vessel
After securing your bracket, the next step is selecting a matching marine flag pole that can handle the drag forces of your specific boat. While you wait for your custom-fit hardware to arrive, prepare your tower by giving the mounting surface a final cleaning. Ensure any residue from previous mounts is completely removed. Before you submit your custom fabrication request, run through this final checklist:
Verify you've provided the Outside Diameter (OD), not just the circumference.
Confirm the measurement was taken at the exact height where you intend to mount.
Check that your high-resolution photos clearly show the caliper reading and the tower profile.
Ensure there are no new obstructions like relocated speakers or light bars.
Taking the time to learn how to measure for a custom boat flag mount ensures a seamless installation. You'll notice the difference immediately: no rattling, no rotation, and a look that feels completely integrated into your boat's design. This methodical approach results in a rock-solid display that stands up to the most demanding conditions.
Secure Your Flag for High-Speed Performance
Precision is the only foundation for a flag display that actually survives the high-speed marine environment. We've established that generic hardware is a compromise that leads to vibration and permanent tower damage. By mastering how to measure for a custom boat flag mount, you've moved beyond guesswork and toward a bespoke engineering solution. You now have the technical knowledge to capture your tower's exact geometry, whether you're navigating the curves of a Malibu G5 or the rectangular rails of a modern pontoon boat.
Our workshop takes your data and applies American-made craftsmanship to every CNC-milled part. This ensures a zero-tolerance fit that distributes drag forces evenly across your tower structure. You'll notice the difference the moment you hit the throttle. There's no rattling, no rotation, and no need for the bulky rubber shims that ruin your boat's aesthetics. It's time to equip your vessel with hardware that matches its performance standards.
Order Your Custom-Engineered Boat Flag Bracket to secure a display that is as durable as it is elegant. We're ready to help you finalize a display that looks like it was part of your boat's original design. Your boat deserves a display that stays rock-solid at any speed.
Frequently Asked Questions
What is the most common mistake when measuring for a boat flag mount?
The most frequent error is providing a circumference measurement when the fabricator requires the Outside Diameter. While circumference is easier to capture with a string, it introduces mathematical errors during conversion. Another mistake is measuring over existing rubber shims or tape. You must take your reading on the raw metal surface to ensure the CNC milling process creates a perfect metal-to-metal fit that won't slip at high speeds.
Can I use a soft tape measure if I do not have digital calipers?
We don't recommend using a soft tape measure because it lacks the precision required for a custom-fit bracket. Tape measures can stretch or sit at an angle, leading to an oversized or undersized part. If you don't have digital calipers, a rigid ruler and two flat blocks can work as a makeshift tool. However, for a truly integrated look that withstands high-speed drag, digital calipers are the only reliable option.
How do I measure a tapered tower leg that gets thinner at the top?
When dealing with a tapered leg, you must measure at the exact vertical position where the bracket will be installed. Take three separate readings within a three-inch vertical span to identify the rate of taper. This data helps our engineering team ensure the internal geometry of the mount matches the specific section of your tower. Providing measurements from the base of a leg when you plan to mount at the top results in a loose fit.
Where is the best place on a wakeboard tower to mount a flag?
The optimal mounting location is usually on the rear vertical or angled legs of the tower, well above the board racks. This placement ensures the flag is visible to other vessels while remaining clear of tow ropes and bimini tops. Avoid mounting directly behind tower speakers, as the flag's movement can create acoustic interference or physical wear on the speaker grilles. Choosing a high, unobstructed point maximizes visibility and follows maritime display traditions.
What should I do if my tower is oval rather than round?
If your tower uses an oval profile, you need to provide both the major axis and the minor axis. Use your calipers to find the maximum width and the maximum depth of the tube at your chosen mounting point. Learning how to measure for a custom boat flag mount on non-round tubing is essential for Malibu or Nautique owners. This dual-axis data allows us to mill a custom internal shape that grips the entire surface area.
Do I need to account for the thickness of the powder coating?
You should measure the finished surface of your tower exactly as it sits. Our fabrication process accounts for the standard tolerances of powder coating and anodized finishes. Don't attempt to subtract or add extra space for the finish, as this often leads to a bracket that is too loose. Simply provide the exact caliper reading from the tower's exterior, and our CNC software handles the engineering offsets required for a secure, scratch-free fit.
How much clearance does a standard boat flag need from the bimini top?
A standard flag typically requires enough clearance to prevent the fabric from wrapping around the bimini frame or support poles. You should allow for a swing radius equal to the full length of the flag plus at least six inches of buffer. If your flag is 24 inches long, ensure there are no obstructions within a 30-inch radius of the mount. This prevents fabric tearing and ensures the flag flies freely even when the wind shifts.
Is it better to measure in inches or millimetres for custom fabrication?
While we can work with either unit, decimal inches are the standard for most American marine fabrication. If you are learning how to measure for a custom boat flag mount, using a digital caliper set to inches provides the cleanest data for our CNC machines. Whichever unit you choose, remain consistent across all your measurements. Avoid mixing fractions and decimals, as this increases the risk of a conversion error during the design phase.


Comments