

How to Securely Mount a Flag to a Boat Railing
Updated: Aug 18
A "universal" flag mount is often the weakest link on an otherwise high-performance vessel. You've likely felt the frustration of watching a flag wrap around the pole or hearing the constant rattle of hardware that won't stay tight. Even worse is the discovery of deep scratches on your polished stainless steel because of inferior metal-on-metal contact. Learning how to attach a flag to a boat railing shouldn't involve guesswork or compromise. It requires a specialized approach that respects both the physics of high-speed travel and the integrity of your boat's finish.
We know that your boat's hardware should be as reliable as the engine itself. This guide provides the professional methods needed to secure your flag with total confidence, ensuring it stays upright at 30+ mph without damaging your railings. We'll walk through the selection of marine-grade materials, the mechanics of a precision fit, and the specific techniques used by seasoned boaters to achieve a rattle-free, professional aesthetic that matches the quality of your vessel.
Table of Contents
The Challenges of Mounting Flags on Marine Railings
Mounting a flag on a boat isn't a simple aesthetic choice; it's a mechanical challenge. When you're cruising at 30 knots, the wind drag on a flag creates a constant, vibrating force that attempts to rotate or sheer any hardware attached to your rails. Most boat owners struggle with how to attach a flag to a boat railing because they rely on components designed for static environments. Marine railings are typically made from highly polished 316 stainless steel or anodized aluminum. These surfaces are intentionally slick to resist corrosion, which makes them incredibly difficult for generic clamps to grip securely.
Temporary fixes like zip ties or bungee cords are common sights at the marina, but they are fundamentally flawed. Standard plastic zip ties degrade rapidly under intense UV exposure and saltwater spray. They become brittle and snap, often leading to the loss of both your flag and your pole. Furthermore, these makeshift solutions offer zero vibration dampening, allowing the pole to rattle against the railing and eventually mar the finish.
Why "Universal" Fits Often Fail
The physics of a round bracket on a round railing creates a natural pivot point. Unless the bracket is machined to the exact diameter of your rail, it will eventually slip. Many generic mounts use a "one size fits most" approach, relying on plastic shims or over-tightened bolts to stay in place. This rarely works. Under the stress of high-speed travel, these mounts rotate downward, leaving your flag dragging in the water or tangled in your gear. This isn't just a nuisance; it's a failure to respect maritime flag traditions and the equipment itself. When a universal mount fails, the cost isn't just the price of the bracket. It's the replacement of a high-quality flag and the potential damage to other equipment on your deck.
Protecting Your Railing’s Finish
Metal-on-metal contact is a primary enemy of vessel maintenance. When a stainless steel bracket is clamped directly onto a stainless rail without a precision liner, it creates microscopic scratches. In a saltwater environment, these scratches become breeding grounds for "tea staining" or localized corrosion. Generic mounts often require you to use messy electrical tape or thick rubber shims to prevent this damage. These "hacks" look unprofessional and trap moisture against the metal. A custom-engineered bracket eliminates this risk by using high-quality, integrated liners that provide a snug fit. This mechanical bond distributes the pressure evenly, ensuring the mount stays stationary without requiring excessive torque that could crush or dent thinner-walled aluminum tubing.
Evaluating Rail Mount Hardware: Clamps vs. Sockets
Selecting the correct hardware is the first technical decision in mastering how to attach a flag to a boat railing. You're generally choosing between the versatility of a clamp-on bracket and the permanence of a fixed socket. While traditional wood poles might look classic on a slow-moving trawler, high-performance vessels with wakeboard towers or stainless bow rails require hardware engineered for mechanical grip. This level of hardware quality is standard on professional vessels, such as those you would experience on a Hamptons private boat charter. The material choice is non-negotiable. 316 stainless steel remains the marine gold standard because it contains molybdenum, an element that specifically resists the pitting and crevice corrosion common in saltwater environments.
Clamp-on brackets are the most practical solution for most boaters. They allow you to position your flag on bow rails, stern rails, or towers without drilling permanent holes into your vessel. However, not all clamps are equal. When evaluating a bracket, look for dual-bolt systems. These provide even clamping pressure across the rail surface, which prevents the "pivot" effect mentioned previously. High-quality engineered flag pole brackets also feature integrated anti-slip liners. These liners serve two purposes: they create the friction necessary to stay upright at high speeds and they act as a protective barrier for your boat's finish. This prevents the metal-on-metal contact that leads to unsightly scratches and galvanic corrosion.
Marine Flag Pole Sockets
Fixed sockets offer a more permanent, heavy-duty display. These are often flush-mounted into the gunwale or a flat section of the railing system. If you choose a socket, drainage is your primary concern. A socket without a drain hole traps saltwater, which will eventually rot the base of your flagpole or corrode the mounting screws from the inside out. You also need to consider the display angle. A 90-degree vertical socket is standard for stern displays, while slanted sockets (usually 15 or 30 degrees) provide better visibility and prevent the flag from drooping against the hull. Proper orientation is more than just an aesthetic choice; it ensures you're following the U.S. Flag Code by displaying the national ensign in a position of honor and clarity.
For those who frequently trailer their boats or use boat covers, quick-release mounting systems are superior to permanent screw-tightened clamps. These systems allow you to remove the entire pole and flag assembly in seconds while leaving the base mount securely attached to the rail. This prevents the flag from becoming a tangled mess during transport and protects the fabric from unnecessary UV degradation when the boat is docked. Whether you choose a clamp or a socket, the goal is a rattle-free installation that feels like a factory-integrated part of your boat rather than an afterthought.
Step-by-Step: How to Attach Your Flag Safely
Precision installation is the difference between a secure display and a lost investment. When you're determining how to attach a flag to a boat railing, you must treat the railing as a mechanical substrate rather than just a mounting point. A methodical approach prevents hardware failure and ensures your display remains professional even in heavy chop. This process begins long before you head to the dock.
Preparation and Measurement
Start with the math. Use a digital caliper to measure the exact outside diameter of your railing. Don't guess; marine rails often come in specific increments like 7/8 inch, 1 inch, or 1.25 inches. If you don't have a caliper, wrap a string around the rail to find the circumference, then divide that number by 3.14 to calculate the diameter. This measurement is critical for selecting a bracket that provides a total 360-degree grip without gaps.
Once you've confirmed the size, clean the mounting area thoroughly. Use a non-abrasive marine cleaner to strip away salt spray, dried wax, or oily residue. This ensures that the bracket's liner makes a direct, high-friction bond with the metal. A clean surface prevents the bracket from migrating or rotating during high-speed runs. Finally, verify that your flag pole diameter matches the internal bore of the bracket or socket. A sloppy fit here creates a leverage point that can eventually snap the hardware.
The Attachment Process
Secure the flag to the pole using marine-grade clips or stainless steel grommets. Unlike generic methods that suggest you simply "clip and go," you need to maintain consistent vertical tension between the attachment points. If the flag is too loose, the wind will cause it to wrap around the pole or whip violently. This unnecessary movement shreds the fabric and puts uneven stress on the mounting rings. Position the flag so it sits entirely clear of bimini tops, antennas, or fishing rod holders to prevent snagging during a tack or turn.
When mounting the bracket to the rail, apply a small drop of medium-strength thread-locking compound to the mounting screws. This prevents the constant vibration of the hull and engine from backing out the hardware over time. Tighten the bolts evenly, alternating between them to ensure the clamp halves remain perfectly parallel. This distributes the clamping force across the entire surface of the rail rather than concentrating it on a single point.
Perform a final "shake test" by grasping the pole and attempting to move the assembly. It shouldn't budge. If there's any play, re-examine the fit or the liner alignment. Mastering how to attach a flag to a boat railing correctly means your hardware stays put even when the water gets choppy. This methodical approach ensures your vessel looks sharp and your equipment remains exactly where you installed it.
High-Speed Stability and Safety Strategies
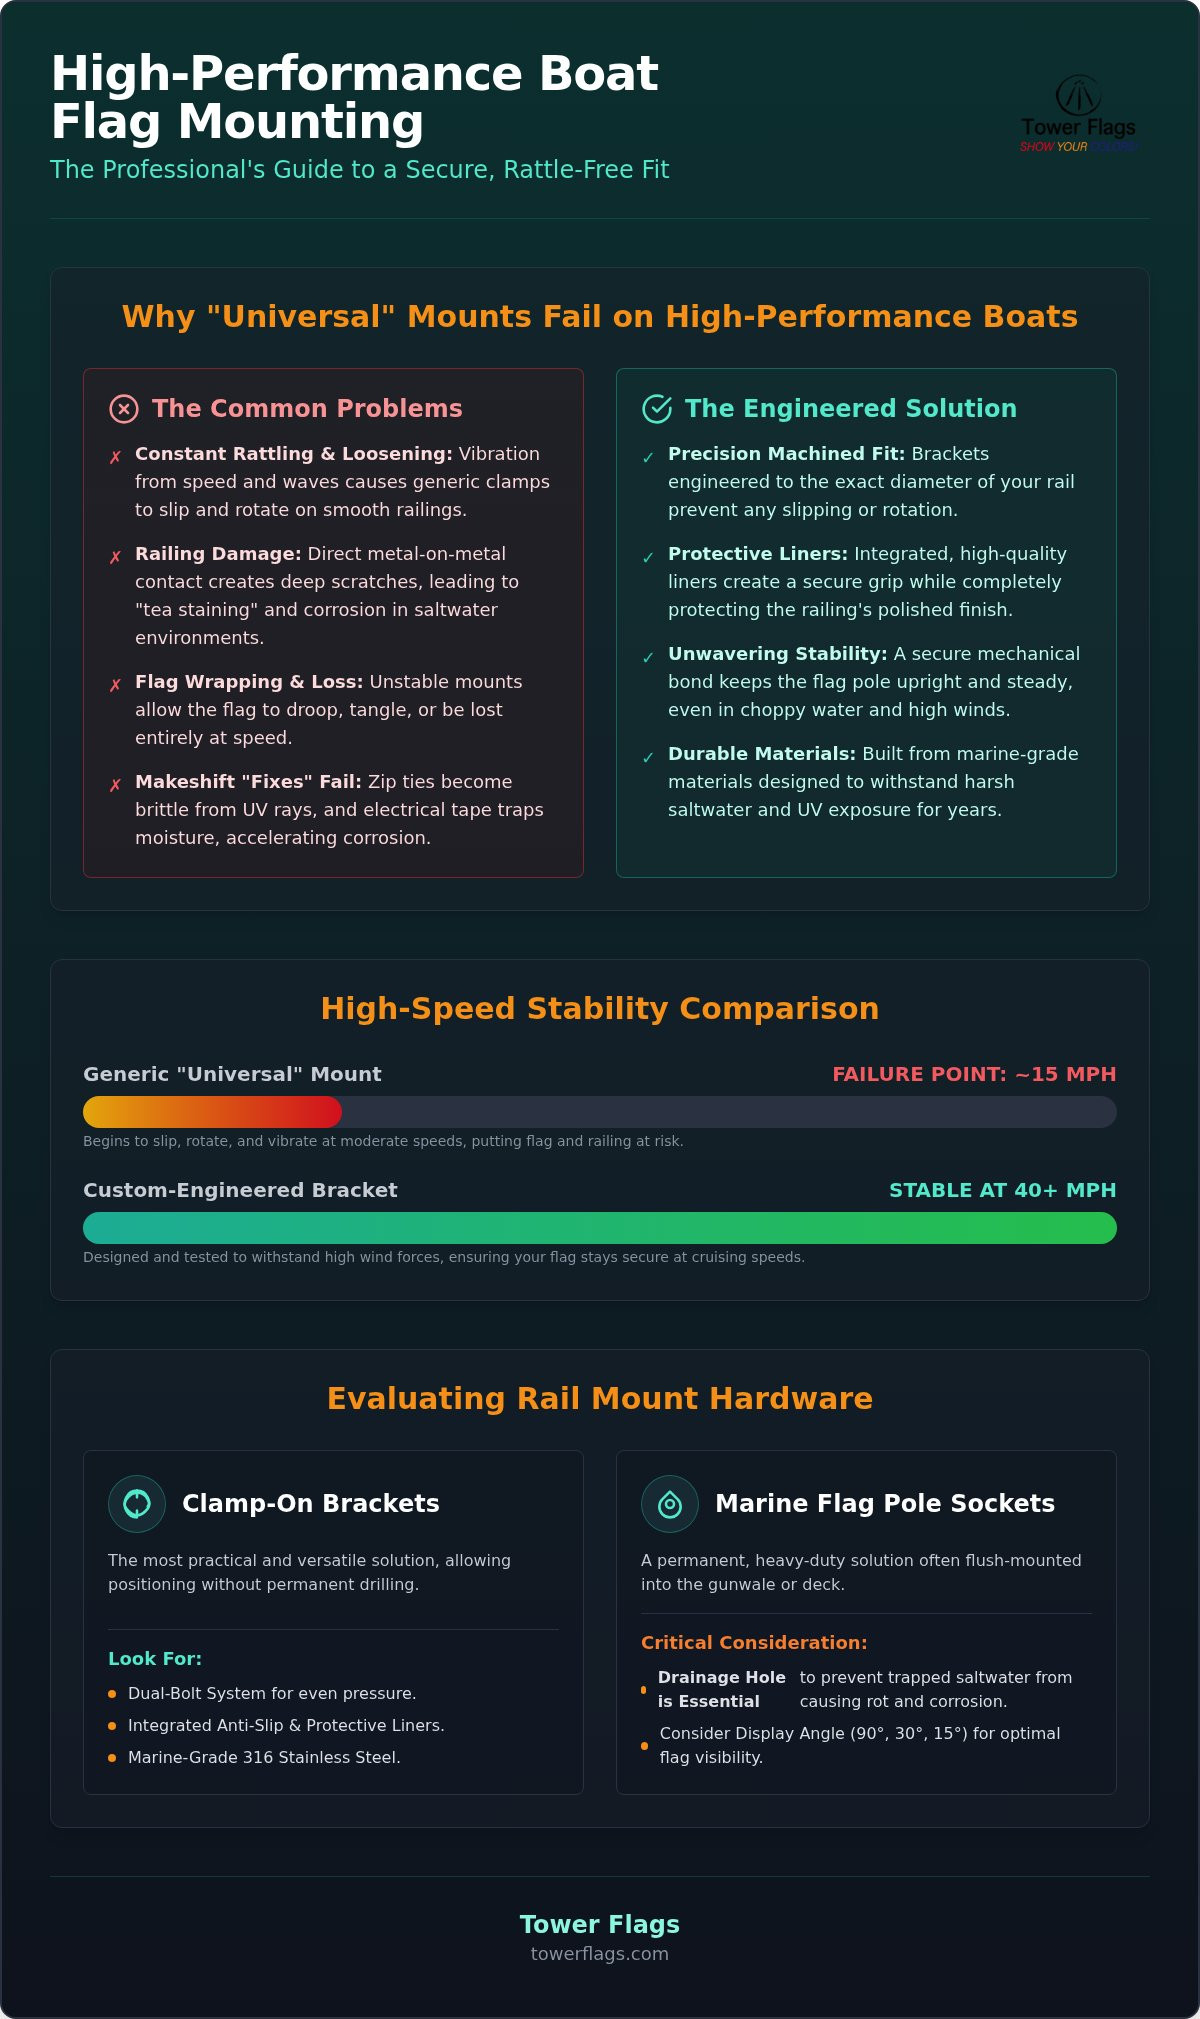
Most online forums suggest slowing down if you want to fly a flag, but a well-engineered vessel shouldn't be limited by its hardware. The physics of wind drag at 40 mph and beyond are unforgiving. As your speed increases, the force on your flag mount grows exponentially. A standard 12x18 inch flag might seem manageable, but a larger 3x5 foot flag has over six times the surface area, creating massive leverage against your railing. Understanding how to attach a flag to a boat railing for high-speed use requires moving beyond generic clips and embracing hardware designed for mechanical loads.
Managing Wind Load
The size of your flag directly dictates the stress placed on your rail mount. While a small courtesy flag generates moderate drag, larger ensigns act like sails. This load is transferred through the pole to the bracket. Heavy-duty boat flag poles made from marine-grade aluminum or stainless steel are essential because they won't shatter under the pressure of a sudden gust. Some degree of pole flexibility is beneficial for absorbing shock, but a pole that's too soft will whip violently. This "snap-back" effect causes metal fatigue in the railing and can lead to hardware failure. If you plan on cruising at performance speeds, you should upgrade to custom boat flag brackets that are precision-machined to handle these specific aerodynamic forces.
Positioning is also a factor in stability. Avoid mounting your flag in areas where it catches "dirty air" or turbulence from the center console or windshield. Turbulent air causes the flag to snap erratically, which increases the vibration transmitted to the railing. Placing the mount in a "clean air" stream ensures a steady pull, which is much easier on your hardware and keeps the flag visible without tangling. To ensure your setup is ready for the open water, shop our collection of heavy-duty boat flag poles designed for high-speed stability.
Safety and Compliance
Safety on the water involves more than just secure bolts. Your flag must never obstruct the captain’s 360-degree line of sight. Mount your hardware at a height that respects maritime etiquette while keeping the fabric clear of the helm. This is particularly important on boats with towers where a low-hanging flag can block the view of trailing skiers or nearby vessels. You also need to perform regular inspection intervals. Every three to four trips, check the mounting screws and the integrity of the rail liner. Saltwater and vibration can loosen even the best installations over time.
Finally, respect the "Breakaway" rule. Your bracket and pole must be the strongest components in the system. In an extreme weather event or a high-speed mishap, you want the flag fabric to tear or the clips to fail before the mount rips a chunk out of your expensive stainless steel railing. This hierarchy of failure protects the structural integrity of your vessel while ensuring your flag remains a proud, secure addition to your boat.
Why Custom-Engineered Brackets Outperform Generic Mounts
When you research how to attach a flag to a boat railing, you'll encounter countless generic products claiming universal compatibility. These big-box store kits are often mass-produced using thin plastics or inferior alloys that cannot withstand the rigors of a marine environment. A custom-engineered bracket represents a shift from temporary "hacks" to a permanent, integrated solution. It eliminates the need for unsightly rubber shims or layers of electrical tape that eventually peel and leave a sticky residue on your polished stainless steel. Investing in precision hardware ensures that your flag display remains a point of pride rather than a maintenance headache.
The Problem with "One Size Fits Most"
The fundamental flaw in universal hardware is the gap between the clamp and the rail. Even a fraction of a millimeter of play allows vibration to start. Over time, this microscopic movement leads to structural fatigue in both the bracket and the railing itself. Generic mounts often rely on single-point pressure, which can dent thin-walled aluminum towers if over-tightened. This lack of precision fit is why many flags eventually droop or rotate downward during a cruise. Custom engineering ensures 100% surface contact. This distributes the load across the entire circumference of the rail, providing maximum grip without the risk of crushing the substrate. By eliminating the "slop" found in generic designs, you prevent the rattle that plagues lower-quality installations.
The Tower Flags Difference
We focus on the specific needs of performance vessels, including high-speed wake towers and custom railings that require more than a standard clamp. Our brackets are American-made and reflect the pride of craftsman-level fabrication. We reject the "good enough" standard of mass-produced alternatives in favor of exactness. By choosing high-performance marine flag poles paired with precision-fit mounts, you invest in long-term value. You won't find yourself replacing lost flags or damaged poles after a single season of heavy use. Instead, you get a secure, rattle-free display that matches the high-end aesthetic of your boat. This specialized approach allows you to focus on the water, knowing your equipment is built to handle the drag and vibration of every run. Our goal is to provide a mount that feels like a factory-installed component, ensuring your vessel maintains its professional appearance while your flag flies proud at any speed.
Upgrade Your Vessel's Performance and Aesthetic
Securely mounting a flag is more than an aesthetic choice; it's an engineering necessity for high-performance boating. We've explored why generic, one-size-fits-all hardware fails under the stress of wind drag and how a precision-fit approach protects your boat's finish. By focusing on marine-grade materials and exact measurements, you eliminate the vibration and structural fatigue that lead to equipment loss. Mastering how to attach a flag to a boat railing ensures your vessel looks professional while your gear stays exactly where it belongs, even at 40+ mph.
Don't settle for mass-produced clips that compromise your boat's integrity. Secure your flag with custom-engineered brackets from Tower Flags. Our craftsman-quality marine fabrication provides high-performance hardware built for speed and custom-fit for your specific vessel. Equip your boat with the reliability it deserves and enjoy the peace of mind that comes with a secure, rattle-free display on your next run.
Frequently Asked Questions
Can I use a flag pole on a round railing without it spinning?
You can absolutely prevent a flag pole from spinning on a round railing by using a precision-fit bracket rather than a universal clamp. Generic mounts typically fail because they rely on single-point pressure, which creates a pivot point. A custom-engineered bracket is machined to the exact diameter of your rail, ensuring total surface contact. This mechanical bond, combined with a high-quality liner, provides the friction necessary to resist rotation even during high-speed runs.
What is the best material for a boat rail flag mount?
The gold standard for marine hardware is 316 stainless steel due to its superior resistance to pitting and saltwater corrosion. Anodized aluminum is a strong alternative for freshwater environments or weight-sensitive applications. Avoid plastic-heavy kits or chrome-plated zinc, as these materials degrade rapidly under UV exposure and salt spray. High-quality flag pole brackets made from marine-grade metals ensure longevity and maintain a professional aesthetic that matches your vessel's existing hardware.
How do I prevent my flag from tangling around the pole?
To prevent tangling, use 360-degree rotating mounting rings or anti-wrap clips that allow the flag to move independently of the pole. Maintaining proper vertical tension between the attachment points is also critical. If the flag is too loose, it'll easily wrap around the pole during a tack or a change in wind direction. Correcting how to attach a flag to a boat railing involves ensuring the fabric can fly freely without snagging.
Is it safe to leave my flag up while trailering the boat?
It's generally not recommended to leave your flag up while trailering at highway speeds. While our brackets are designed for high-speed water travel, the combined force of 70 mph road speeds and unpredictable wind gusts can shred flag fabric and put extreme stress on the mounting hardware. Removing the pole and flag during transport protects your investment from road debris and UV damage. Use a quick-release system to make this transition seamless.
Will a metal clamp scratch my stainless steel railings?
A metal clamp'll only scratch your railings if it lacks a protective liner or is made from a mismatched material that causes galvanic corrosion. High-end mounts use integrated, non-abrasive liners that act as a barrier between the bracket and the rail. This design prevents metal-on-metal contact while providing the grip needed for stability. Ensuring a snug, custom fit is the most effective way to protect your vessel's finish from the microscopic vibrations that cause marring.
What size flag is appropriate for a 20-25 foot boat?
For a 20-25 foot boat, a 12x18 inch or 16x24 inch flag is typically the most appropriate size. Larger flags, such as a 3x5 foot ensign, create significant wind drag that can overwhelm rail-mounted hardware on smaller vessels. It's important to balance visibility with the structural limits of your railing. A smaller flag often looks more proportional and stays more stable at cruising speeds, reducing the mechanical load on your bracket and pole.
How tight should I tighten the bolts on a rail mount?
Bolts should be tightened until the bracket is immobile, but you must avoid over-torquing, which can dent aluminum tubing or strip the threads. Tighten the bolts evenly and in an alternating pattern to keep the clamp halves parallel. Applying a medium-strength thread-locking compound is more effective than excessive force for preventing vibration-induced loosening. If the bracket requires extreme torque to stay in place, it's likely a poor fit for your specific railing diameter.
Do I need a different mount for a wakeboard tower vs. a bow rail?
You often need a different mount because wakeboard towers typically have larger diameters than standard bow or stern rails. Bow rails are frequently 7/8 inch or 1 inch, while towers can range from 1.5 to 3 inches. Understanding how to attach a flag to a boat railing means matching the bracket to the specific circumference of the mounting point. Using a bracket designed for the exact size of your tower ensures a secure, rattle-free fit.


Comments